Row Level Security in Power BI is a critical feature that allows organizations to control access to data within reports based on the roles of individual users. By implementing RLS, organizations can ensure that users only see the data that is relevant to them, thereby enhancing data privacy and compliance with organizational policies. This article delves into the concepts, types, and implementation of RLS in Power BI, with a focus on both static and dynamic approaches.
What is RLS in Power BI?
Row Level Security in Power BI is a technique used to restrict data access for certain users within a dataset. RLS works by filtering data based on the role of the user, allowing only the relevant subset of data to be visible. This is particularly important for large organizations that need to manage access to sensitive data across different departments, roles, or geographical regions.
Types of RLS in Power BI
RLS can be broadly categorized into two types: Static RLS and Dynamic RLS.
Static RLS:
- Definition: Static RLS defines data access rules that are hardcoded and do not change based on the user context. The roles and permissions are explicitly defined in the Power BI model.
- Use Cases: Static RLS is suitable for scenarios where access control is straightforward and does not require frequent changes. For example, if a sales report needs to be segmented by region and each region has a fixed set of users who can view the data, Static RLS is ideal.
- Implementation: To implement Static RLS, roles are created in Power BI Desktop under the "Modeling" tab. Each role is associated with a DAX (Data Analysis Expressions) filter that defines the rows of data the role can access.
Dynamic RLS:
- Definition: Dynamic RLS determines access based on the user’s identity at runtime. The rules are not hardcoded but are instead dynamically generated based on user attributes, such as their department or region.
- Use Cases: Dynamic RLS is ideal for organizations with complex and frequently changing access requirements. For instance, if a report needs to filter data based on the current user's department, regardless of who the user is, Dynamic RLS is appropriate.
- Implementation: Dynamic RLS typically involves using a lookup table that maps users to their roles or permissions. This table is then referenced in the DAX filter expression to control data visibility dynamically.
Implementing Static RLS in Power BI
Steps to Implement Static RLS:
Create Roles in Power BI Desktop
- Open Power BI Desktop and load your data.
- Go to the Modeling tab.
- Select Manage roles.

Manage Roles
Define Roles and DAX Filters
- In the Manage roles dialog box, select New.

Select NEW Role
- Name your role (e.g., Sales Manager).
- Under Tables, select the table you want to filter.
- Define a DAX expression that filters the data for that role. For example, if you want to filter by a City column:
[City] = "Pune"
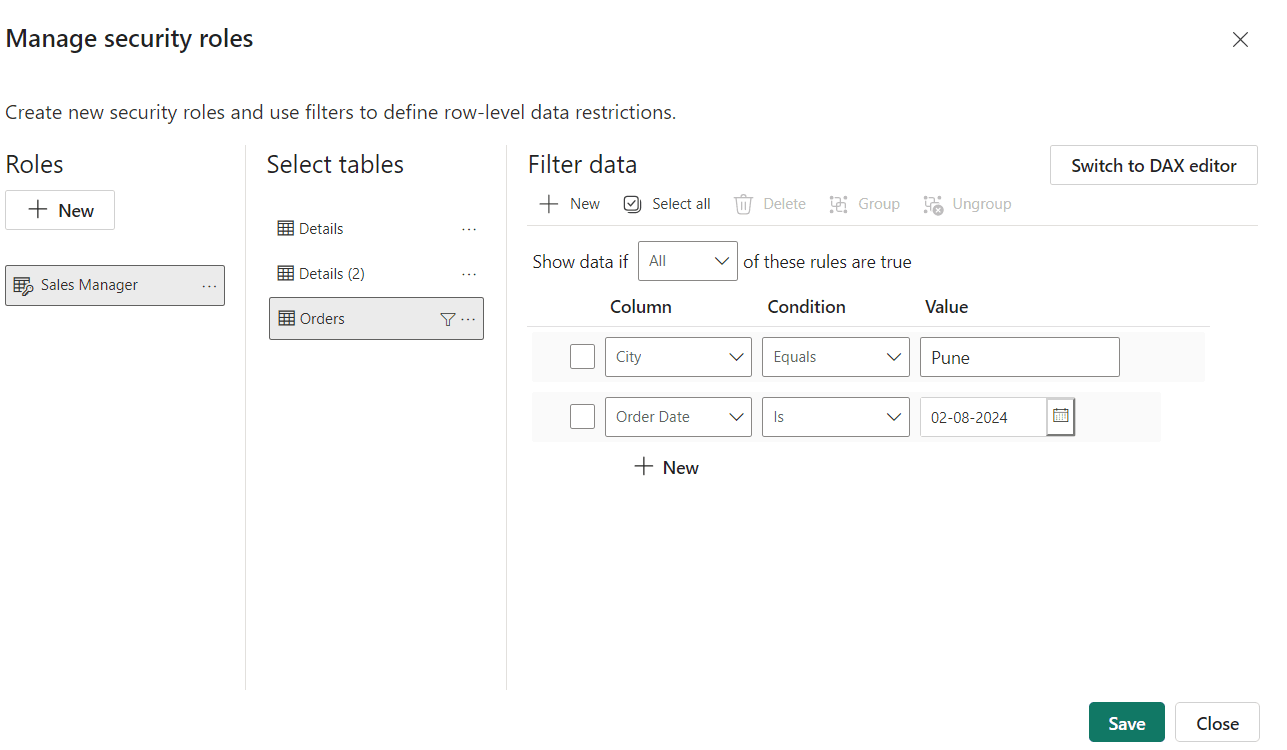
Filter data
- You can add multiple DAX expressions for different tables as needed.
- You can optionally choose 'Switch to Default Editor' to define your role using the DAX editor. DAX expressions will return either true or false.
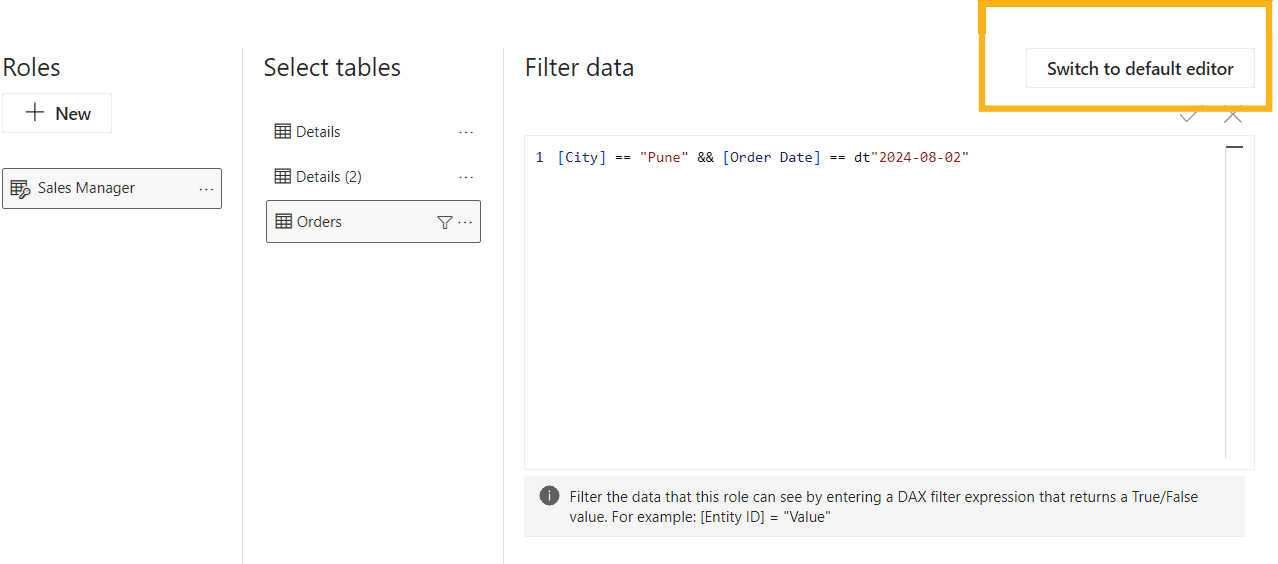
Switch to Default editor
- Test the Roles:
- After defining the roles, it's crucial to test them by using the "View as Roles" feature. This allows you to simulate what the report will look like for users in different roles.
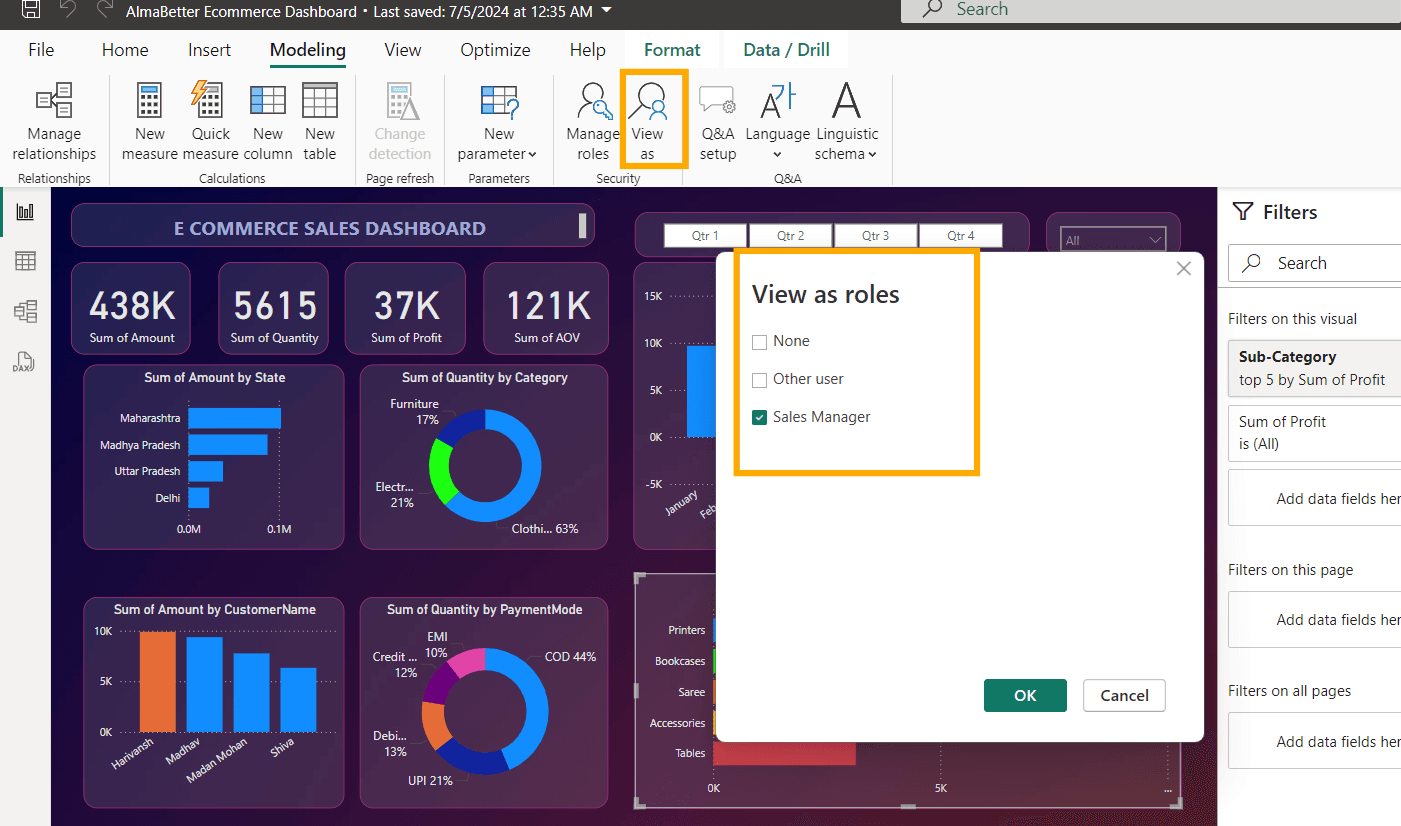
View As Roles
- Publish the Report to Power BI Service:
- Once the roles are defined and tested, publish the report to Power BI Service. Here, you can assign users to the roles you created in Power BI Desktop.
- Go to the dataset settings in Power BI Service, select "Security," and add users to the appropriate roles.
Advantages and Limitations of Static RLS:
- Advantages:
- Easy to set up and manage.
- Suitable for scenarios with a stable set of users and access requirements.
- Limitations:
- Lacks flexibility; changes in access requirements necessitate manual updates.
- Not ideal for large organizations with complex access needs.
Implementing Dynamic RLS in Power BI
Steps to Implement Dynamic RLS:
- Create a Security Table:
- A security table should be created within the Power BI model that contains user information, such as usernames, roles, and any other attributes relevant to access control.
- For example, the table could have columns for Username, Department, and Region.
- Establish Relationships:
- Establish a relationship between the security table and the relevant data tables in the model. This relationship is crucial as it enables the filtering of data based on the user's role dynamically.
- Define DAX Filters:
- In the "Manage Roles" section, create a DAX filter that references the security table. For example, to filter data based on the user’s department, a DAX expression like [Department] = LOOKUPVALUE(Security[Department], Security[Username], USERNAME()) can be used.
- The USERNAME() function returns the name of the current user, which is then matched against the security table to determine the appropriate data to display.
- Test the Implementation:
- As with Static RLS, use the "View as Roles" feature to test the dynamic filtering to ensure it behaves as expected for different users.
- Deploy and Manage:
- Publish the Power BI report to the service and manage role assignments as needed. Unlike Static RLS, the Dynamic RLS setup will automatically adjust the data visible to users based on their attributes in the security table.
Advantages and Limitations of Dynamic RLS:
- Advantages:
- Highly flexible, adapting to complex and changing access requirements.
- Reduces the need for manual updates to roles, as the filtering is based on dynamic user attributes.
- Limitations:
- More complex to set up and maintain compared to Static RLS.
- Requires careful design of the security table and DAX expressions to ensure correctness and performance.
Real World Use Cases of RLS in Power BI
- Finance Department Reports:
- Use RLS to restrict access to sensitive financial data such as profit margins or executive compensation, ensuring that only authorized personnel can view specific financial figures.
- Example: Financial analysts can see detailed expense reports, while department managers only see summarized expenses relevant to their department.
- Sales Reports by Region:
- Implement RLS to provide sales teams with access to regional data only. This ensures that sales representatives can view data pertinent to their territories, without exposing other regions' performance data.
- Example: A sales manager in Europe can view sales data for Europe, but not for North America.
Tips
- Dynamic RLS: You can implement dynamic RLS by using functions like USERPRINCIPALNAME() in your DAX expressions. This function returns the user’s email address, allowing you to filter data based on the logged-in user dynamically.
- Multiple Roles: Users can be assigned to multiple roles, and they will see data allowed by any of the roles they belong to.
Best Practices for Implementing RLS in Power BI
- Clearly Define Security Requirements: Before implementing RLS, it’s crucial to have a clear understanding of the security requirements and the different user roles.
- Keep the Model Simple: Whether using Static or Dynamic RLS, simplicity in design helps in maintaining the model and ensuring performance.
- Regularly Review Roles and Permissions: Regular audits of roles and permissions ensure that the RLS configuration remains aligned with organizational policies.
- Test Thoroughly: Always test the RLS implementation under various user scenarios to ensure it functions correctly.
Conclusion
Row Level Security Power BI is a powerful feature that allows organizations to control data access at a granular level. Whether through Static or Dynamic RLS, the implementation of this feature can greatly enhance data security and compliance. By carefully planning and testing RLS, organizations can ensure that their data is accessible only to those who need it, thereby maintaining confidentiality and integrity within their Power BI reports.
Key Takeaways on Implementing RLS in Power BI
- Row-Level Security (RLS) in Power BI controls data access based on user roles, ensuring data relevance and privacy.
- RLS helps organizations comply with data privacy policies by restricting users' access to only the data they need.
- There are two main types of RLS: Static RLS and Dynamic RLS.
- Static RLS uses hardcoded rules for data access, suitable for straightforward and stable access needs.
- Static RLS is easy to implement but lacks flexibility, requiring manual updates for any access changes.
- Dynamic RLS determines data access at runtime based on the user's attributes, allowing for more complex and adaptive scenarios.
- Dynamic RLS is ideal for organizations with frequently changing or complex access requirements, but it is more complex to set up and maintain.
- Implementing Static RLS involves creating roles with DAX filters, testing them, and assigning users to roles in Power BI Service.
- Implementing Dynamic RLS involves creating a security table, establishing relationships, defining DAX filters, and testing dynamic filtering.
- Best practices for RLS include clearly defining security requirements, keeping the model simple, regularly reviewing roles, and thoroughly testing the implementation.


